Oracle Data Provider Installation Guide for Sitecore 5.3.
1. Requirements
-
Server: Oracle 9i (9.1) or later version.
-
Client: Oracle 9i (9.2) ClientRuntime or later version.
-
ODP.NET
-
.NET Framework 2.0
-
Sitecore 5.3
2. Installing the Package
Unpack the ZIP package on the web server over an existing Sitecore site.
It may be necessary to copy the /install folder to the database server to install Sitecore databases.
The /install folder in the installation package also contains the following files:
-
Export.bat
Exports the existing Oracle database to the sitecore.dmp file created in the same folder. The following parameters are accepted:- database name (the name of existing Oracle database, which is to be dumped; “sitecore” is used if not specified);
- password (the password to the mentioned database; “manager” is used if not specified);
- prefix (the prefix of the existing Sitecore databases; “sc” is used if not specified).
As a result, the file sitecore.dmp is created in the same location, containing the dump of the specified database.
-
Upgrade3XXto3XX.bat
Upgrades the Oracle database schema from v3.X.X to v3.X.X. The following parameters are accepted:- database name (the name of the database to upgrade; “sitecore” is used if not specified);
- prefix (the prefix “sc” is used if not specified).
3. Database Server Configuration
Database Server Configuration Instructions.
3.1. Preparing the Server
-
Install Oracle Database Server.
Please refer to Oracle documentation towards this step.
-
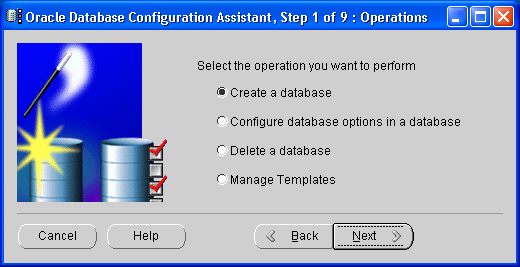
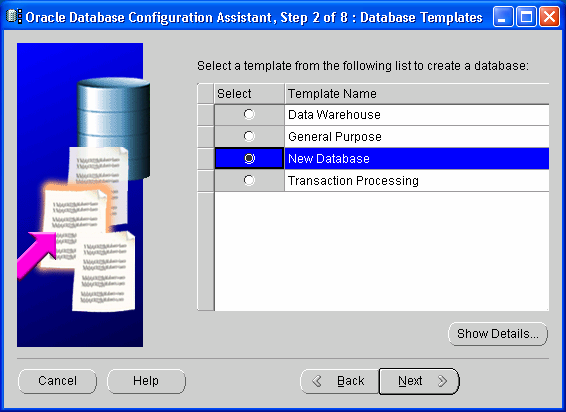
Create new Oracle database instance.
Database for Sitecore schemas should be created. You can use built-in Database Configuration Assistant for this purpose.

Modify database parameters on following steps (you can disable all additional features since they are not needed for Sitecore).
It’s recommended to change the default password values (the wizard will prompt you to do this).
3.2. Installing Sitecore
Oracle connector comes with a set of installation scripts and data files which can be found in the /install folder of the installation package.
By default, scripts connect to Oracle using the following connection string: system/manager@sitecore. It is possible to change this behavior by passing command-line arguments to the *.bat files.
By using files in the /install folder it is possible either to install default Sitecore databases from the package or copy data from existing MS SQL Server installation.
Important Performance Note:
ODP.NET provider used by Sitecore Oracle data provider sets the TraceLevel system registry value to 3 by default which causes the ODP.NET to write traces on each command. This takes up about 40% of processing time. Set this value to 0 to speed up the provider. The path to the key is HKEY_LOCAL_MACHINE/SOFTWARE/ORACLE/ODP.NET, the value name is TraceLevel.
You can also run /install/odpnet.reg file supplied with the installation archive to update the system registry automatically.
3.2.1. Installing Default Sitecore Databases
Creating and populating schemas for Sitecore is necessary to execute the createdata.bat file in the /install folder. The usage is:
createdata.bat [DATABASE] [PASSWORD] [PREFIX]
createdata.bat understands the following environment variables and command line parameters:
|
DATABASE |
TNS Service name to access Oracle (default: sitecore) |
|
PASSWORD |
Password for system user in the database (default: manager) |
|
ORACLE_DATA_DIR |
Path to Oracle data storage folder (default: D:\Oracle\oradata). The script will create the tablespace data file in %ORACLE_DATA_DIR%\%DATABASE% folder. |
|
PREFIX |
Prefix for schemas (default: sc) It is possible to install multiple instances of Sitecore onto a single Oracle database by setting different prefixes during import. |
Notes:
-
The script will create a log file in the same folder with name %DATABASE%log.txt
-
Please notice, if you run import script not from server, you should add appropriate TNS name into your configuration. You can use Net Configuration Assistant from Oracle client tools or modify file <orahome>/network/admin/tnsnames.ora file.
-
The script will install schemas into tablespace 'SITECORE' which will be created if it does not exist. The parameters for creating tablespace can be found in createtablespace.sql file.
- Currently only tablespace 'SITECORE' is supported for installation.
3.2.2. Copying Existing MS SQL Database to Oracle
3.2.2.1. Creating Empty Schemas for Sitecore
Empty schemas for Sitecore can be created by running the createschema.bat script in the /install folder. The usage is:
createschema.bat [DATABASE] [PASSWORD] [PREFIX] [TBS]
createschema.bat understands the following environment variables and command line parameters:
|
DATABASE |
TNS Service name to access Oracle (default: sitecore) |
|
PASSWORD |
Password for system user in the database (default: manager) |
|
ORACLE_DATA_DIR |
Path to Oracle data storage folder (default: D:\Oracle\oradata). The script will create tablespace data file in %ORACLE_DATA_DIR%\%DATABASE% folder. |
|
PREFIX |
Prefix for schemas (default: sc) By setting different prefixes during import it is possible to install multiple instances of Sitecore onto a single Oracle database. |
|
TBS |
Name of the tablespace to create user schemas in. (default:sitecore) Parameters for creating the tablespace can be set in createtablespace.sql |
3.2.2.2. Transferring Data from MS SQL to Appropriate Schemas
To transfer existing data from MS SQL, you should use the OracleTransferTool program which is located in the /install/mssql2oracle folder.
Here are the steps to follow for data migration from MS SQL to the Oracle database:
- Run OracleTransferTool.
- Input MS Sql server connection data: server name, user credentials, prefix and suffix of database names.
- Input TNS Service name for the database with Sitecore schemas and prefix for user schemas (default:sc).
- Click the "Transfer DB" button.
4. Web Server Configuration
-
Install Oracle Windows Client on the web server.
Please refer to Oracle documentation towards this step. -
Install ODP.NET data provider.
http://www.oracle.com/technology/software/htdocs/distlic.html?/technology/software/tech/windows/odpnet/utilsoft.html
-
Configure Oracle client.
Add an appropriate TNS name into your configuration. You can use Net Configuration Assistant from Oracle client tools or modify the file <orahome>/network/admin/tnsnames.ora file. -
Configure Sitecore.
Modify the /App_Config/Oracle/ServerConnections.config file. Change attributes of the <connections> element as follows:
- database - TNS service name of the Oracle database.
- prefix - prefix of user schemas which contain Sitecore data.
Modify the web.config file. Set attributes as follows:
<sitecore database="Oracle">
...
<connections serverMode="Server">
5. Upgrade Instructions
Upgrading Oracle DataProvider from v3.1.0 to v3.2.0.
Follow the steps below to upgrade the module:
- Backup the existing Oracle database
- Run the following script from the /install folder:
Upgrade310to320.bat <dbname> [prefix]
([prefix] is the optional parameter)
- Replace Sitecore.Oracle.dll in the /bin folder
Upgrading Oracle DataProvider from v3.0.0 to v3.1.0.
Follow the steps below to upgrade the module:
-
Backup the existing Oracle database
-
Run the following script from the /install folder:
Upgrade.bat <dbName> <prefix>
- Replace Sitecore.Oracle.dll in the /bin folder